Windows Server 2008 R2 provides two clustering technologies, which are both included on the Enterprise and Datacenter Editions. Clustering is the grouping of independent server nodes that are accessed and viewed on the network as a single system. When a service and/or application is run from a cluster, the end user can connect to a single cluster node to perform his work, or each request can be handled by multiple nodes in the cluster. In cases where data is read-only, the client might request data from one server in the cluster and the next request might be made to a different server and the client would never know the difference. Also, if a single node on a multiple node cluster fails, the remaining nodes will continue to service client requests and only the clients that were originally connected to the failed node may notice either a slight interruption in service, or their entire session might need to be restarted depending on the service or application in use and the particular clustering technology that is in use for that cluster.The first clustering technology provided with Windows Server 2008 R2, Enterprise and Datacenter Editions is failover clustering. Failover clusters provide system fault tolerance through a process called failover. When a system or node in the cluster fails or is unable to respond to client requests, the clustered services or applications that were running on that particular node are taken offline and moved to another available node where functionality and access are restored. Failover clusters, in most deployments, require access to shared data storage and are best suited, but not necessarily limited to, the deployment of the following services and applications:
- File services— File services deployed on failover clusters provide much of the same functionality a standalone Windows Server 2008 R2 system can provide, but when deployed as clustered file services, a single data storage repository can be presented and accessed by clients through the currently assigned and available cluster node without replicating the file data.
- Print services— Print services deployed on failover clusters have one main advantage over a standalone print server: If the active print server fails, each of the shared printers is made available to clients using another designated print server in the cluster. Although deploying and replacing printers to computers and users is easily managed using Group Policy deployed printers, when standalone print servers fail, the impact can be huge, especially when servers, devices, services, and applications that cannot be managed with group policies access these printers.
- Database services— When large organizations deploy line-of-business applications, e-commerce, or any other critical services or applications that require a back-end database system that must be highly available, deploying database services on failover clusters is the preferred method. Also, in many cases configuring enterprise database services can take hours and the size of the databases, indexes, and logs can be huge, so deploying database services on a standalone system encountering a system failure may results in several hours of undesired downtime during repair or restore, instead of quick recovery as with a failover cluster.
- Back-end enterprise messaging systems— For many of the same reasons as cited previously for deploying database services, enterprise messaging services have become critical to many organizations and are best deployed in failover clusters.
- Hyper-V virtual machines— As many organizations move toward server consolidation and conversion of physical servers to virtual servers, providing a means to also maintain high availability and reliability has become even more essential when a single physical Hyper-V host has several critical virtual machines running on it.
The second Windows Server 2008 R2 clustering technology is Network Load Balancing (NLB), which is best suited to provide fault tolerance for front-end web applications and websites, Remote Desktop Services Session Host server systems, VPN servers, streaming media servers, and proxy servers. NLB provides fault tolerance by having each server in the cluster individually run the network services or applications, removing any single points of failure. Depending on the particular needs of the service or application deployed on an NLB cluster, there are different configuration or affinity options to determine how clients will be connected to the back-end NLB cluster nodes. For example, on a read-only website, client requests can be directed to any of the NLB cluster nodes; during a single visit to a website, a client might be connected to different NLB cluster nodes. As another example, when a client attempts to utilize an e-commerce application to purchase goods or services provided through a web-based application on an NLB cluster, the client session should be initiated and serviced by a single node in the cluster, as this session will most likely be using Secure Sockets Layer (SSL) encryption and will also contain specific session data, including the contents of the shopping cart and the end-user specific information.
Microsoft does not support running failover clusters and Network Load Balancing on the same Windows Server 2008 R2 system.
Windows Server 2008 R2 Cluster Terminology
Before failover or NLB clusters can be designed and implemented, the administrator deploying the solution should be familiar with the general terms used to define the clustering technologies. The following list contains the many terms associated with Windows Server 2008 R2 clustering technologies:
- Cluster— A cluster is a group of independent servers (nodes) that are accessed and presented to the network as a single system.
- Node— A node is an individual server that is a member of a cluster.
- Cluster resource— A cluster resource is a service, application, IP address, disk, or network name defined and managed by the cluster. Within a cluster, cluster resources are grouped and managed together using cluster resource groups, now known as Services and Applications groups.
- Services and Applications group— Cluster resources are contained within a cluster in a logical set called a Services and Applications group or historically referred to as a cluster group. Services and Applications groups are the units of failover within the cluster. When a cluster resource fails and cannot be restarted automatically, the Services and Applications group this resource is a part of will be taken offline, moved to another node in the cluster, and the group will be brought back online.
- Client Access Point— A Client Access Point is a term used in Windows Server 2008 R2 failover clusters that represents the combination of a network name and associated IP address resource. By default, when a new Services and Applications group is defined, a Client Access Point is created with a name and an IPv4 address. IPv6 is supported in failover clusters but an IPv6 resource either needs to be added to an existing group or a generic Services and Applications group needs to be created with the necessary resources and resource dependencies.
- Virtual cluster server— A virtual cluster server is a Services or Applications group that contains a Client Access Point, a disk resource, and at least one additional service or application-specific resource. Virtual cluster server resources are accessed either by the domain name system (DNS) name or a NetBIOS name that references an IPv4 or IPv6 address. A virtual cluster server can in some cases also be directly accessed using the IPv4 or IPv6 address. The name and IP address remain the same regardless of which cluster node the virtual server is running on.
- Active node— An active node is a node in the cluster that is currently running at least one Services and Applications group. A Services and Applications group can only be active on one node at a time and all other nodes that can host the group are considered passive for that particular group.
- Passive node— A passive node is a node in the cluster that is currently not running any Services and Applications groups.
- Active/passive cluster— An active/passive cluster is a cluster that has at least one node running a Services and Applications group and additional nodes the group can be hosted on, but are currently in a waiting state. This is a typical configuration when only a single Services and Applications group is deployed on a failover cluster.
- Active/active cluster— An active/active cluster is a cluster in which each node is actively hosting or running at least one Services and Applications group. This is a typical configuration when multiple groups are deployed on a single failover cluster to maximize server or system usage. The downside is that when an active system fails, the remaining system or systems need to host all of the groups and provide the services and/or applications on the cluster to all necessary clients.
- Cluster heartbeat— The cluster heartbeat is a term used to represent the communication that is kept between individual cluster nodes that is used to determine node status. Heartbeat communication can occur on a designated network but is also performed on the same network as client communication. Due to this internode communication, network monitoring software and network administrators should be forewarned of the amount of network chatter between the cluster nodes. The amount of traffic that is generated by heartbeat communication is not large based on the size of the data but the frequency of the communication might ring some network alarm bells.
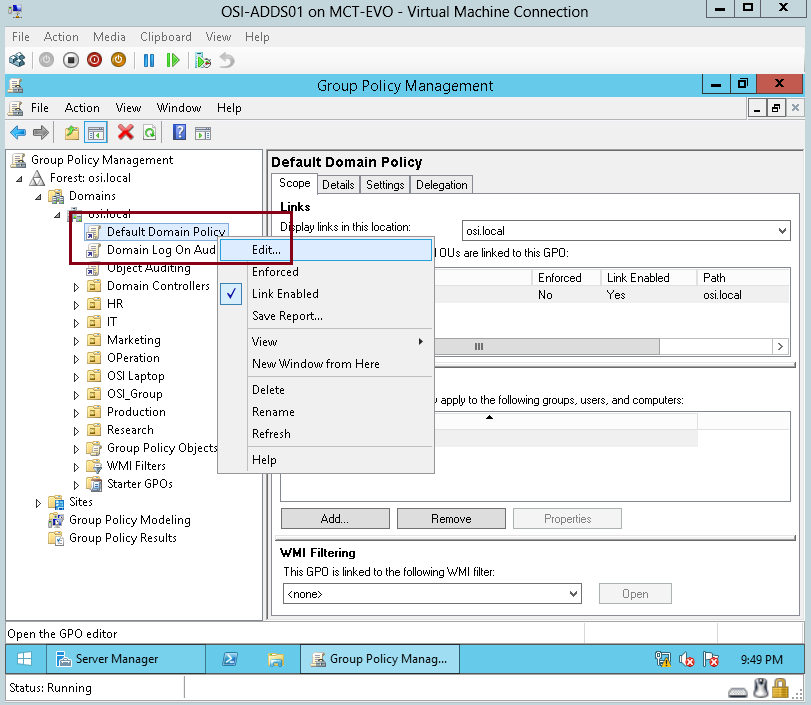
- Cluster quorum— The cluster quorum maintains the definitive cluster configuration data and the current state of each node, each Services and Applications group, and each resource and network in the cluster. Furthermore, when each node reads the quorum data, depending on the information retrieved, the node determines if it should remain available, shut down the cluster, or activate any particular Services and Applications groups on the local node. To extend this even further, failover clusters can be configured to use one of four different cluster quorum models and essentially the quorum type chosen for a cluster defines the cluster. For example, a cluster that utilizes the Node and Disk Majority Quorum can be called a Node and Disk Majority cluster.
- Cluster witness disk or file share— The cluster witness or the witness file share are used to store the cluster configuration information and to help determine the state of the cluster when some, if not all, of the cluster nodes cannot be contacted.
- Generic cluster resources— Generic cluster resources were created to define and add new or undefined services, applications, or scripts that are not already included as available cluster resources. Adding a custom resource provides the ability for that resource to be failed over between cluster nodes when another resource in the same Services and Applications group fails. Also, when the group the custom resource is a member of moves to a different node, the custom resource will follow. One disadvantage or lack of functionality with custom resources is that the Failover Clustering feature cannot actively monitor the resource and, therefore, cannot provide the same level of resilience and recoverability as with predefined cluster resources. Generic cluster resources include the generic application, generic script, and generic service resource.
- Shared storage— Shared storage is a term used to represent the disks and volumes presented to the Windows Server 2008 R2 cluster nodes as LUNs. In particular, shared storage can be accessed by each node on the cluster, but not simultaneously.
- Cluster Shared Volumes— A Cluster Shared Volume is a disk or LUN defined within the cluster that can be accessed by multiple nodes in the cluster simultaneously. This is unlike any other cluster volume, which normally can only be accessed by one node at a time, and currently the Cluster Shared Volume feature is only used on Hyper-V clusters but its usage will be extended in the near future to any failover cluster that will support live migration.
- LUN— LUN stands for Logical Unit Number. A LUN is used to identify a disk or a disk volume that is presented to a host server or multiple hosts by a shared storage array or a SAN. LUNs provided by shared storage arrays and SANs must meet many requirements before they can be used with failover clusters but when they do, all active nodes in the cluster must have exclusive access to these LUNs.
- Failover — Failover is the process of a Services and Applications group moving from the current active node to another available node in the cluster when a cluster resource fails. Failover occurs when a server becomes unavailable or when a resource in the cluster group fails and cannot recover within the failure threshold.
- Failback— Failback is the process of a cluster group automatically moving back to a preferred node after the preferred node resumes operation. Failback is a nondefault configuration that can be enabled within the properties of a Services and Applications group. The cluster group must have a preferred node defined and a failback threshold defined as well, for failback to function. A preferred node is the node you would like your cluster group to be running or hosted on during regular cluster operation when all cluster nodes are available. When a group is failing back, the cluster is performing the same failover operation but is triggered by the preferred node rejoining or resuming cluster operation instead of by a resource failure on the currently active node.
- Live Migration— Live Migration is a new feature of Hyper-V that is enabled when Virtual Machines are deployed on a Windows Server 2008 R2 failover cluster. Live Migration enables Hyper-V virtual machines on the failover cluster to be moved between cluster nodes without disrupting communication or access to the virtual machine. Live Migration utilizes a Cluster Shared Volume that is accessed by all nodes in the group simultaneously and it transfers the memory between the nodes during active client communication to maintain availability. Live Migration is currently only used with Hyper-V failover clusters but will most likely extend to many other Microsoft services and applications in the near future.
- Quick Migration— With Hyper-V virtual machines on failover clusters, Quick Migration provides the option for failover cluster administrators to move the virtual machine to another node without shutting the virtual machine off. This utilizes the virtual machine’s shutdown settings options and if set to Save, the default setting, performing a Quick Migration will save the current memory state, move the virtual machine to the desired node, and resume operation shortly. End users should only encounter a short disruption in service and should reconnect without issue depending on the service or application hosted within that virtual machine. Quick Migration does not require Cluster Shared Volumes to function.
- Geographically dispersed clusters— These are clusters that span physical locations and sometimes networks to provide failover functionality in remote buildings and data centers, usually across a WAN link. These clusters can now span different networks and can provide failover functionality, but network response and throughput must be good and data replication is not handled by the cluster.
- Multisite cluster— Geographically dispersed clusters are commonly referred to as multisite clusters as cluster nodes are deployed in different Active Directory sites. Multisite clusters can provide access to resources across a WAN and can support automatic failover of Services and Applications groups defined within the cluster.
- Stretch clusters— A stretch cluster is a common term that, in some cases, refers to geographically dispersed clusters in which different subnets are used but each of the subnets is part of the same Active Directory site—hence, the term stretch, as in stretching the AD site across the WAN. In other cases, this term is used to describe a geographically dispersed cluster, as in the cluster stretches between geographic locations.
1.Node Majority – Used when Odd number of nodes are in cluster.
2.Node and Disk Majority – Even number of nodes(but not a multi-site cluster)
3.Node and File Share Majority – Even number of nodes, multi-site cluster
4.Node and File Share Majority – Even number of nodes, no shared storage
Explain about each Quorum type ?
Node Majority: Each node that is available and in communication can vote. The cluster functions only with a majority of the votes, that is, more than half.
Node and Disk Majority: Each node plus a designated disk in the cluster storage (the “disk witness”) can vote, whenever they are available and in communication. The cluster functions only with a majority of the votes, that is, more than half.
Node and File Share Majority: Each node plus a designated file share created by the administrator (the “file share witness”) can vote, whenever they are available and in communication. The cluster functions only with a majority of the votes, that is, more than half.
No Majority: Disk Only: The cluster has quorum if one node is available and in communication with a specific disk in the cluster storage.
Can I convert a standard cluster to an MNS cluster?
Yes. You can use Cluster Administrator to create a new Majority Node Set resource and then, on the cluster properties sheet Quorum tab, change the quorum to that Majority Node Set resource.