This is my Part 6 of 7 of NAP deployment, which is how to configure Windows 8 to support NAP…
For the last 5 Full Step by Step, we already gone through long & tiring process on to configure our Infrastructure for NAP, and in this Part 6, lets configure Windows 8 so that our client can comply with NAP policy…
1- Log in to your Windows 8 client PC, on the Search menu, type MMC and press Enter…
2 – In the MMC Console, click File, and then click Add/Remove Snap-in…
3 – In the Add or Remove Snap-ins window, click NAP Client Configuration, clickAdd, choose Local Computer and then click OK…
4 – In the Add or Remove Snap-ins window, click OK…
5 – In Console1 interface, click Enforcement Clients and then right-click EAP Quarantine Enforcement Client, and click Enable…
6 – Close all open console / menu then open Services.msc, look for Network Access Protection Agent and double click on it…
In the Network Access Protection Agent Properties (Local Computer) interface, in the Startup type list, click Automatic, click Start, and then click OK.
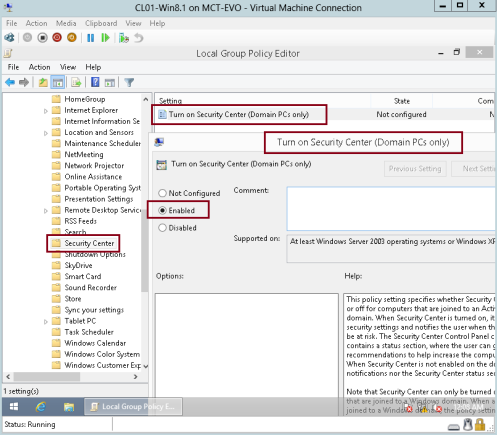
7 – Next, open Gpedit.msc…
8 – In the console tree, expand Local Computer Policy, expand Computer Configuration, expand Administrative Templates, expand Windows Components, and then click Security Center…
Double-click Turn on Security Center (Domain PCs only), click Enabled, and then click OK…
We done for now.. in my last step later which step 7, i will go through how toestablish VPN connection in Windows 8…


No comments:
Post a Comment