As we all know, DNS is one of the most critical network services for any network, because there are many applications and services such as ADDS, rely on DNS to resolve resource names to IP addresses.
Without DNS, user authentications fail, and network-based resources and applications might become inaccessible.
For these reasons in mind, you need to manage and protect DNS.
Since DNS is a critical network service, as a Server Administrator you must protect it as much as possible.
A number of options are available for protecting the DNS server, including :
• DNS cache locking
• DNS socket pool
• DNSSEC
• DNS cache locking
• DNS socket pool
• DNSSEC
Before we start the step by step to implement the DNS Security, lets go through a theory behind this technology.
DNS Cache Locking
Cache locking is a Windows Server 2012 R2 security feature that allows you to control when information in the DNS cache can be overwritten. When a recursive DNS server responds to a query, it caches the results so that it can respond quickly if it receives another query requesting the same information. The period of time the DNS server keeps information in its cache is determined by the Time to Live (TTL) value for a resource record.
DNS Socket Pool
The DNS socket pool enables a DNS server to use source port randomization when it issues DNS queries. When the DNS service starts, the server chooses a source port from a pool of sockets that are available for issuing queries. Instead of using a predicable source port, the DNS server uses a random port number that it selects from the DNS socket pool. The DNS socket pool makes cache-tampering attacks more difficult because a malicious user must correctly guess both the source port of a DNS query and a random transaction ID to successfully run the attack. The DNS socket pool is enabled by default in Windows Server 2012 R2.
DNSSEC
DNSSEC enables a DNS zone and all records in the zone to be signed cryptographically so that client computers can validate the DNS response. DNS is often subject to various attacks, such as spoofing and cache-tampering. DNSSEC helps protect against these threats and provides a more secure DNS infrastructure.
For more information, please log in to : http://technet.microsoft.com/en-us/library/cc731367.aspx
So now, lets go through a simple step how you as Server Administrator can implement DNS Security.
1st – Step to configure DNSSEC.
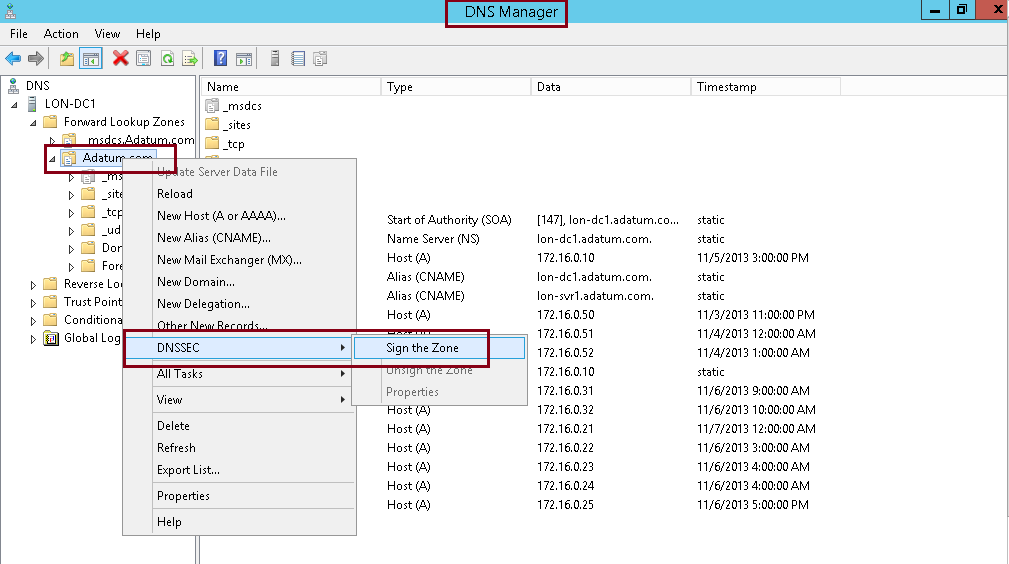
1 – Open Server Manager, click Tools and open DNS Manager, in the DNS Manager, browse to your Domain name, then right click domain name, click DNSSEC and then click Sign the Zone…
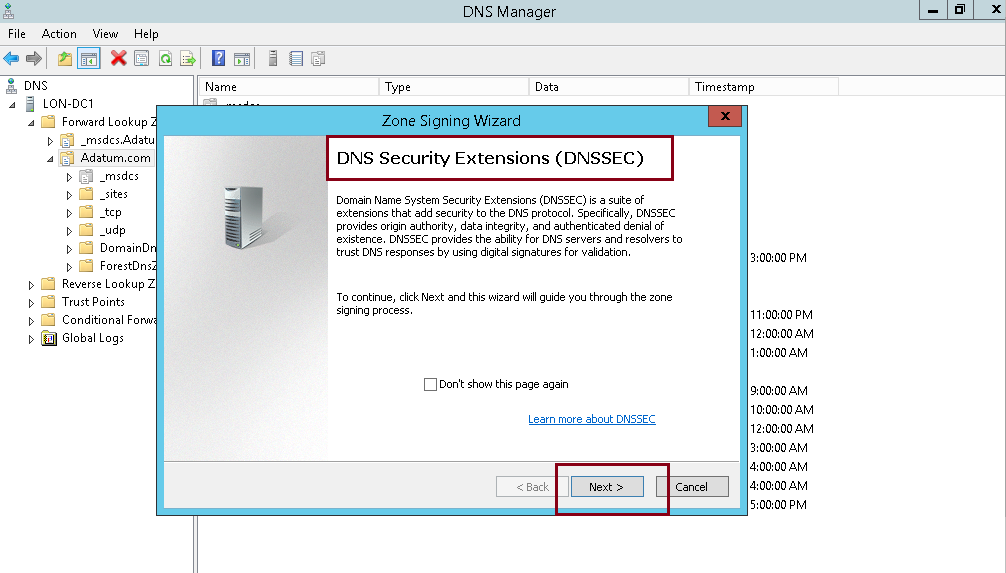
2 – In the Zone Signing Wizard interface, click Next…
3 – On the Signing options interface, click Customize zone signing parameters, and then click Next…

4 – On the Key Master interface, ensure that “The DNS server LON-DC1 is selected as the Key Master“, and then click Next…

5 – On the Key Signing Key (KSK) interface, click Next…

6 – On the Key Signing Key (KSK) interface, click Add…

7 – On the New Key Signing Key (KSK) interface, click OK…
** please spend some time to go through about key properties on the New Key Signing Key (KSK) interface.

8 – On the Key Signing Key (KSK) interface, click Next…

9 – On the Zone Signing Key (ZSK) interface, click Next…

10 – On the Zone Signing Key (ZSK) interface, click Add…

11 – On the New Zone Signing Key (ZSK) interface, click OK…

12 – On the Zone Signing Key (ZSK) interface, click Next…

13 – On the Next Secure (NSEC) interface, click Next…
** NSEC is when the DNS response has no data to provide to the client, this record authenticates that the host does not exist…

14 – On the Trust Anchors (TAs) interface, check the Enable the distribution of trust anchors for this zone check box, and then click Next.
** A trust anchor is an authoritative entity that is represented by a public key. The TrustAnchors zone stores
preconfigured public keys that are associated with a specific zone.
preconfigured public keys that are associated with a specific zone.

15 – On the Signing and Polling Parameters interface, click Next…

16 – On the DNS Security Extensions (DNSSEC) interface, click Next, and then click Finish…


17 – In the DNS console, expand Trust Points, expand com, and then click your domain name.
Ensure that the DNSKEY resource records display, and that their status is valid…

18 – Next, open Group Policy Management, expand Forest: Adatum.com, expand Domains, expand Adatum.com, right-click Default Domain Policy, and then click Edit…

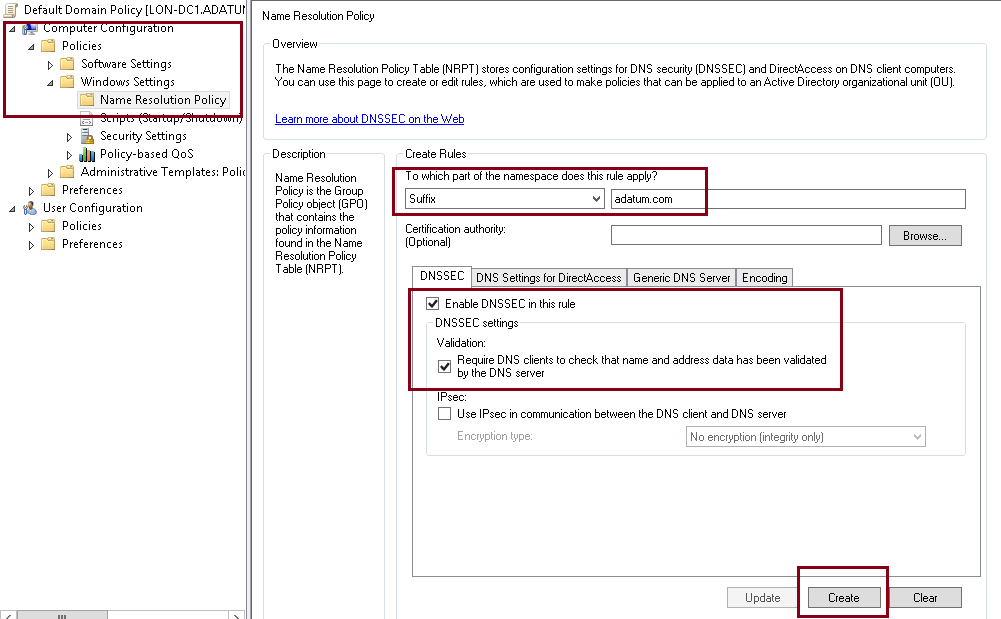
19 – In the Group Policy Management Editor interface, under Computer Configuration, expand Policies, expand Windows Settings, and then click Name Resolution Policy…
** In the right pane, under Create Rules, in the Suffix box, type Adatum.com to apply the rule to the suffix of the namespace.
** Select both the Enable DNSSEC in this rule check box and the Require DNS clients to check that the name and address data has been validated by the DNS server check box, and then click Create.
2nd – Configure the DNS Socket Pool
1 – In domain Server, open Windows PowerShell and type : Get-DNSServer
** This command displays the current size of the DNS socket pool (on the fourth line in the ServerSetting section). Note that the current size is 2,500.
*** Please take note that the default DNS socket pool size is 2,500. When you configure the DNS socket pool, you can choose a size value from 0 to 10,000. The larger the value, the greater the protection you will have against DNS spoofing attacks.

2 – Now lets change the socket pool size to 3,000…
type : dnscmd /config /socketpoolsize 3000

3 – Restart your DNS Server for the changes to take effect…
** confirm that the new socket pool size now is 3000

3rd – Configure the DNS Cache Locking
1 – In Windows PowerShell, type Get-Dnsserver
** This command will displays the current percentage value of the DNS cache lock.
** Note that the current value is 100 percent.

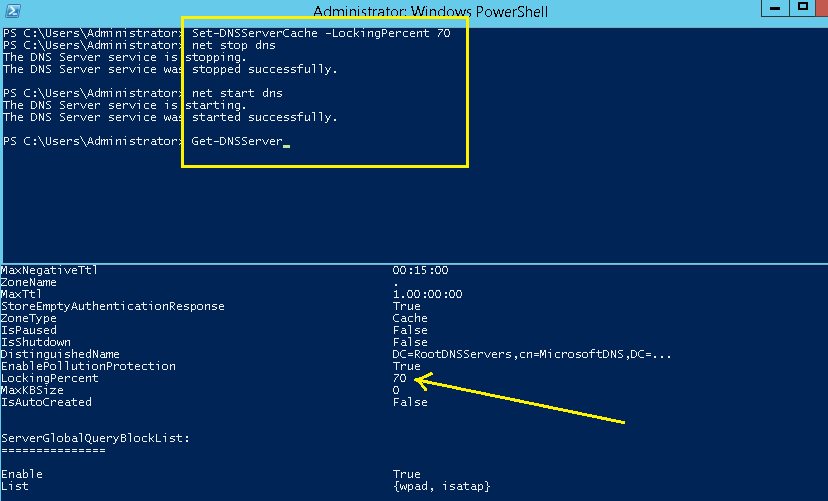
2 – type Set-DnsServerCache –LockingPercent 70
** This changes the cache lock value to 70 percent
*** Please take note that you configure cache locking as a percentage value.
For example, if the cache locking value is set to 50, then the DNS server will not overwrite a cached entry for half of the duration of the TTL.
So By default, the cache locking percentage value is 100.
This means that cached entries will not be overwritten for the entire duration of the TTL.
So, as a best practice, you should set your cache locking settings to at least 90%.
OK folk, that’s all for now, i will continue blogging later on the how to configure a GlobalNames zone in DNS.
Windows System Administrator : Implementing Dns Security In Windows Server 2012 R2 >>>>> Download Now
ReplyDelete>>>>> Download Full
Windows System Administrator : Implementing Dns Security In Windows Server 2012 R2 >>>>> Download LINK
>>>>> Download Now
Windows System Administrator : Implementing Dns Security In Windows Server 2012 R2 >>>>> Download Full
>>>>> Download LINK