Some organizations need to deploy multiple domains or even multiple forests.
Deploying AD DS domain controllers in this scenario is not much more complicated than deploying domain controllers in a single domain environment, but there are some special factors that you need to consider.
In this post this time , i’ll show you how to deploy a complex ADDS environment, what i’m going to cover in my post this time?
1 – Implementing Child Domains in AD DS
2 – Trust configuration
3 – Implementing Forest Trusts
4 – forest trust authentication
For more information on the ADDS, please log in to : http://technet.microsoft.com/en-us/library/hh831484.aspx
Before we start, for this demo purposes, i’ll be using 3 domain server and 1 Member Server so that i can stimulate the child domain process & trust process…
My Domain Server consist of :
1 – TOR-DC1
2 – LON-DC1
3 – TREY-DC1
4 – LON-SVR2 (Member Server)
Lets get started…
1st – Installing Active Directory Domain Services on Child Domain
1 – on the TOR-DC1 domain server, make sure you install Active Directory Domain Services (i skip this step, i pretty sure that most of you know how to complete this step)..
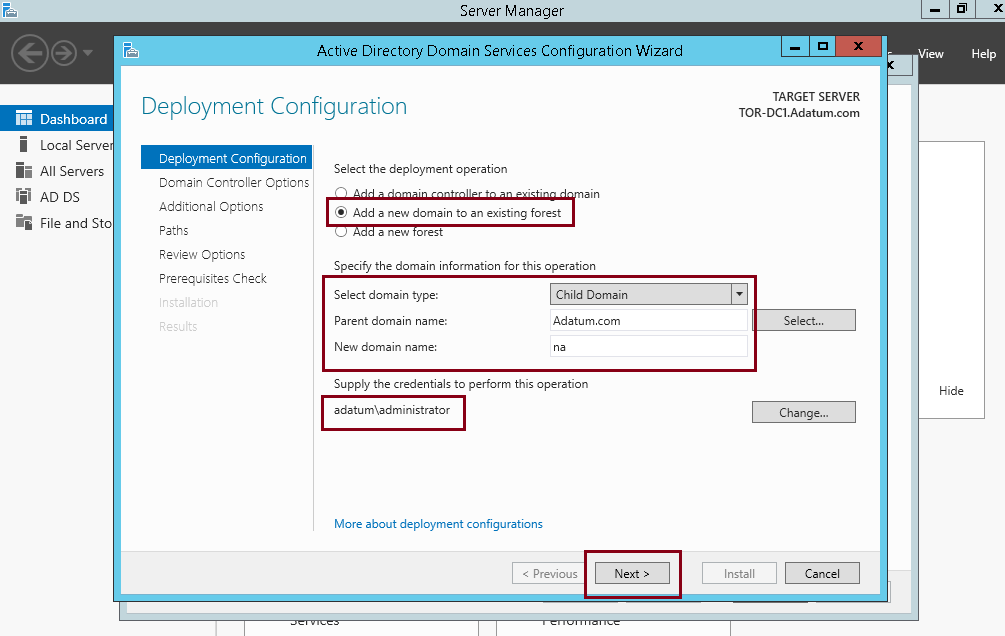
2 – On the the Deployment Configuration interface, click Add a new domain to an existing forest…
** Verify that Select domain type is set to Child Domain, and that Parent domain name is set to Adatum.com.
** In the New domain name text box, type na.
** set credentials to ADATUM\administrator (Current user), and then click Next…
3 – In the Domain Controller Options interface, verify that Domain functional level is set to Windows Server 2012 R2.
** verify that both the Domain Name system (DNS) server and Global Catalog (GC) check boxes are selected.
** Confirm that Site name: is set to Default-First-Site-Name.
** Complete the password and proceed with next…

4 – On the DNS Options interface, click Next…

5 – On the Additional Options interface, click Next…

6 – On the Paths interface, click Next…

7 – On the Review Options interface, click Next…

8 – On the Prerequisites Check interface, confirm that there are no issues, and then click Install…

9 – N0w lets verify the the default trust configuration, once the TOR-DC1 restarted, log in NA\Administrator…
** i do recommend that you check your network connection is connected toadatum.com, if not please right-click Ethernet, and then click Disable. Right-click Ethernet, and then click Enable, then verify that Local Area Connection should now show Adatum.com…

10 – Next, open Active Directory Domains and Trusts…

11 – In the Active Directory Domains and Trusts console, expand Adatum.com, right-click na.adatum.com, and then click Properties…

12 – In the na.adatum.com Properties box, click the Trusts tab, and in the Domain trusted by this domain (outgoing trusts) box, click Adatum.com, and then click Properties…

13 – In the Adatum.com Properties box, click Validate, and then click Yes, validate the incoming trust…

14 – In the User name text box, type administrator, and in the Password text box, type Pa$$w0rd, and then click OK…

15 – When the message The trust has been validated. It is in place and active displays, click OK..
** Click OK twice to close the Adatum.com Properties box.

As at this step, we have successfully implemented child domains in ADDS.
2nd – Implementing Forest Trusts
1 – Switch to LON-DC1 Domain Server, and open DNS…
2 – In the DNS tree pane, expand LON-DC1, right-click Forward Lookup Zones, and then click New Zone…

3 – In the New Zone Wizard interface, click Next…

4 – On the Zone Type interface, click Stub zone, and then click Next…

5 – On the Active Directory Zone Replication Scope interface, click To all DNS servers running on domain controllers in this forest: adatum.com, and then click Next…

6 – In the Zone name: text box, type treyresearch.net, and then click Next…

6 – On the Master DNS Servers inetrface, click , type 172.16.10.10, click on the free space, and then click Next…
** 172.16.10.10 – TREY-DC1

7 – On the Completing the New Zone Wizard interface, click Next, and then click Finish…

8 – Next, right-click the new stub zone treyresearch.net, and then click Transfer from Master and then refresh…
** Confirm that the treyresearch.net stub zone contains records…

9 – Now lets switch to TREY-DC1, open DNS,
** In the tree pane, expand TREY-DC1, select and then right-click Forward Lookup Zones, and then click New Zone.

10 – In the New Zone Wizard interface, click Next…

11 – On the Zone Type interface, click Stub zone, and then click Next…

12 – In the Active Directory Zone Replication Scope interface, click To all DNS servers running on domain controllers in this forest: Treyresearch.net, and then click Next…

13 – In the Zone name: text box, type adatum.com, and then click Next…

14 – On the Master DNS Servers interface, click , type 172.16.0.10, click on the free space, and then click Next…
** 172.16.0.10 – LON-DC01

15 – On the Completing the New Zone Wizard interface, click Next, and then click Finish…

16 – Select and then right-click the new stub zone adatum.com, and then click Transfer from Master…

17 – Right-click adatum.com, and then click Refresh and then confirm that theadatum.com stub zone contains records…

3rd – Next step is to configure a forest trust with authentication…
1 – Switch to LON-DC1, and open Active Directory Domain and Trusts…
2 – In the Active Directory Domains and Trusts management console, right-click Adatum.com, and then click Properties…

3 – In the Adatum.com Properties dialog box, click the Trusts tab, and then click New Trust…

4 – On the New Trust Wizard interface, click Next…

5 – In the Name text box, type treyresearch.net, and then click Next…

6 – On the Trust Type interface, click Forest trust, and then click Next…

7 – On the Direction of Trust interface, click One-way: outgoing, and then click Next…

8 – On the Sides of Trust interface, click Both this domain and the specified domain, and then click Next…

9 – On the User Name and Password interface, type Administrator as the user name and Pa$$w0rd as the password in the appropriate boxes, and then click Next…

10 – On the Outgoing Trust Authentication Level–Local Forest interface, click Selective authentication, and then click Next…

11 – On the Trust Selections Complete interface, click Next…

12 – On the Trust Creation Complete interface, click Next…

13 – On the Confirm Outgoing Trust interface, click Next…

14 – Click Finish…

15 – In the Adatum.com Properties dialog box, click the Trusts tab…
** On the Trusts tab, under Domains trusted by this domain (outgoing trusts), click TreyResearch.net, and then click Properties…

16 – In the treyresearch.net Properties dialog box, click Validate…

17 – Review the message that displays: The trust has been validated. It is in place and active, and then click OK…

18 – Click Yes and close all the interface…

4th – Configure a member server for selective authentication…
1 – On LON-DC1 server, open Active Directory Users and Computers, click View menu, click Advanced Features…

2 – Expand Adatum.com, and then click Computers, right-click LON-SVR2, and then click Properties…

3 – In the LON-SVR2 Properties box, click the Security tab, and then click Add…

4 – On the Select Users, Computers, Service Accounts, or Groups page, click Locations…

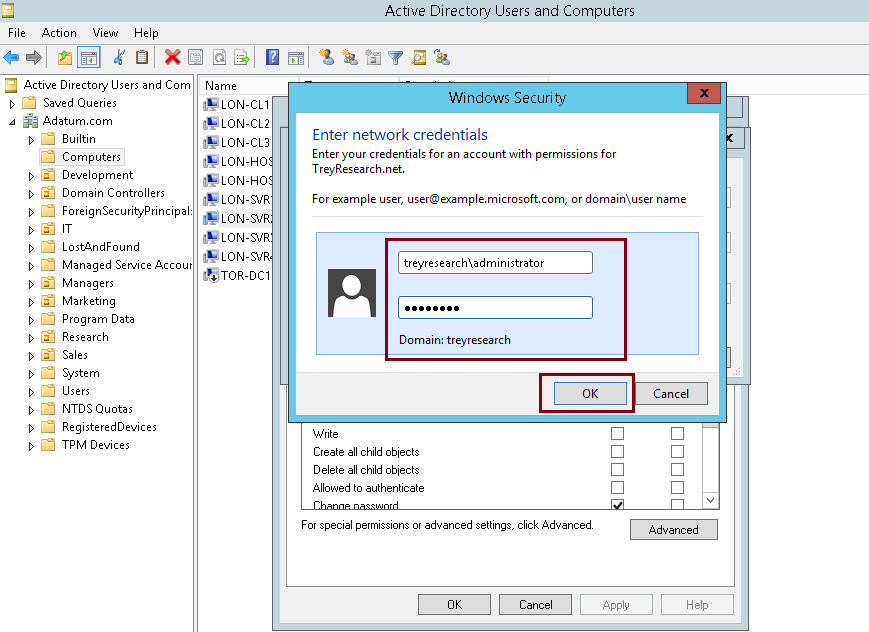
5 – Click TreyResearch.net, and then click OK…

6 – In the Enter Network Credentials box, type treyresearch\administrator with the password Pa$$w0rd, and then click OK…
7 – In the Enter the object name to select (examples:) text box, type IT then click OK…

8 – In the LON-SVR2 Properties interface, verify that IT (TreyResearch\IT) is highlighted, select the Allow check box that is in line with Allowed to authenticate, and then click OK…

9 – Now lets switch to LON-SVR2 member server, create a folder in the C:, then Right-click the folder that you just created, point to Share with, and then click Specific People…

10 – In the File Sharing dialog box, type TreyResearch\IT, and then click Add…

11 – Click Read, and then click Read/Write. Click Share… and then click Done….

12 – Sign in to TREY-DC1 as TreyResearch\Alice or any domain user that you have in IT OU…

13 – open Run and type \\LON-SVR2\IT-Technical-Data, and then click OK…

14 – Verify that you have access to that IT-Technical-Data folder that located in LON-SVR2…

finally, we have successfully implemented forest trusts….
No comments:
Post a Comment